Pages

July 31, 2019

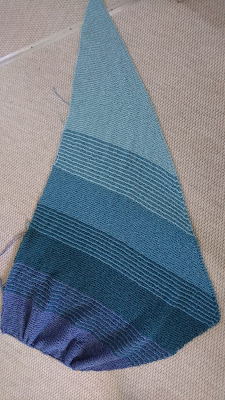
Knit shawl is finished


Perhaps you are just as excited about seeing the final result for my knit shawl in seven different colours as I am to share the photos with you ?

The entire length is 320 cm and the maximum wide is 80 cm. I have used 7 yarns of knit yarn of 50 g each. The yarn is made 50% wool, 30% silk and finally 20% nylon.

So, now I am ready for the colder weather to find it's way to Denmark some time.

I have already brought some yarn for a new knit shawl, which is more fitting to use during Summer time.


July 30, 2019

Rhubarb - white currant jam


When I recently was looking for a recipe on rhubarb jam I found this recipe on rhubarb redcurrant jam made by Vivien Lloyd. In this recipe it is red currants, which is used to get the rhubarb jam to gel. As the garden of my good friends in Horsens does NOT contain red currants, but white currants I decided to to replace red currants with white currants.

As both red as well as white currants contains plenty of seeds, it is recommend to sieve the currants into a puree, which is when added into the rhubarb.

I also think, that you will have more of red colour in the final jam, if you have access to red currants instead of white currants.

And as usual I bring most of my home-made jam with me to work, so my work colleagues can buy the jam and I donate the money to charity afterwards. I make much more jam, than it is possible for me or my mother to eat. It is the creation process, which I find fascinating.

As other suggestions for jam made with rhubarb you could also have a look into this rhubarb - raspberry jam or rhubarb - apple jam. However, the gelled texture is much stronger in this rhubarb - white currant compared to the other two rhubarb jams.

Rhubarb - white currant jam:
  • 500 g rhubarb stems - cleaned and cut into 2 cm length
  • 500 g white currant - washed and cleaned, the stalks removed
  • ½ lemon - only the juice
  • 100 ml water
  • 700 g sugar
  1. Place the white currants in a cooking pot with 100 ml of the water. Bring the white currants to the boil.
  2. Let the white currants simmer until the mass is pulpy.
  3. Mash the white currants with a potato masher.
  4. Sieve the white currants, so you only have the puree without any seeds.
  5. There should be around 225 ml white currant puree.
  6. Place the rhubarb pieces together with the remaining 100 ml water and the lemon juice of ½ lemon in a cooking pot.
  7. Bring the rhubarb to the boil. Let the rhubarb simmer for 15-20 minutes until, the rhubarb mass is pulpy.
  8. Add the 225 ml white currant puree into the rhubarb mass.
  9. Prepare the jam glasses either by heating up in the oven or adding boiling water to them.
  10. Add the sugar into the fruit mass and stir until it is dissolved.
  11. Bring the jam to a rolling boil and boil hard until the setting point is reached. Stir the jam frequently.
  12. Test of set after 7 minutes using the flake test.
  13. When the setting point is reached, remove the pan from the heat and leave it to stand for 5 minutes. As the jam settles, push any scums from the surface of the pan to the side and remove it with a metal spoon. The purpose for the waiting step is well to build viscosity in jam, so the fruit pieces will be trapped inside the jam inside of be going to the top of jam.
  14. Gently stir the jam after the resting time and pour it into the prepared glasses, fill the glasses up to the brim. Remove any scum for the surface of the jam using a tea spoon. Close the glass with a lid.
  15. Leave the glass upright and disturbed to cool and set.
  16. Store at ambient temperature.

July 29, 2019

Black currant cordial


Again I have been inviting myself around to the garden of my good friends in Horsens to pick some more black currants as well as white currants, (so I could make this black currant cordial as well as this all currant jelly). This time my friends were at home, so after my picking currants for my many kitchen projects (look by the coming time to see, what I have been up to), I was served a cup of tea and home-made cake with red currants.

I have located this recipe on black currant cordial in the latest issue for Country Living issue August 2019. And I have made no changes to the recipes. I think, I will test this recipe as well on red and white currants.

Adjust the ratio of water and sugar to the amount of the black currant, which you have picked as well as the amount of black currant juice, which you have after the cooking process.It is an easy recipe to scale up as well as down.

Black currant cordial:

  • 1000 g black currant - washed and cleaned, the stalks removed
  • 300 ml water
  • 300 g sugar per 500 ml black currant juice
  • 1 teaspoon citric acid per 500 ml black currant juice
  1. Place the prepared black currants together with the water in cooking pot.
  2. Bring the black currants to the boil, let the black currant simmer for 10 minutes.
  3. Mask the black currants to release all of the fruit juice.
  4. Pour the black currants either into a jelly bag or into a sieve. It is easier to press the black currants with a cooking spoon, when placed in a sieve based on my experience.
  5. Measure the amount of black currant juice. Add the black currant juice in a cooking pot with 300 g sugar per 500 ml black currant as well as 1 teaspoon citric.
  6. Dissolve the sugar over low heat. The cordial should not be boiled.
  7. Pour the black currant cordial into cleaned bottles.
  8. Dilute the black cordial with water upon serving it.
  9. Enjoy :-)

July 28, 2019

Knit shawl - sixth progess


Now I ready to introduce the seventh and final colour of yellow in this knit shawl, and I am very close to finish the knitting part of this shawl. So in the next blog post you will be able to see the final result in form of the finished knit shawl.

July 27, 2019

All currant jelly


After making a new portion of this red & black currant jelly I got the idea to make an all currant jelly version, as I have access to black, red and white currants from the gardens of both a work colleagues and the garden of my good friends in Horsens. Perhaps you could also refer to this jelly as a tricolour jelly as the berries have the colour of white, red and black ? Well the final colour is that of very dark red, so to make a true tricolour jelly you would have to made three jelly mixture, which is cook on their own and filled own by own after the cooling of the last portion. And this is too much work in my opinion. Let me know, if you try this approach at your kitchen.

And yes, this version of currant jelly could also be used as flavour booster in the sauce for the duck/goose typical served for Christmas here in Denmark. The jelly on it's own is also a great item for serve together with duck/goose and game in general.

So you can say, that I continue my Christmas preparations, while Denmark is covered in sun and heat, so being very fare away from a cold and rainy Christmas time !!!

All currant jelly: 6-8 glasses
  • 700 g red currant - washed and cleaned, the stalks removed
  • 300 g white currant - washed and cleaned, the stalks removed
  • 345 g black currant - washed & cleaned, the stalks removed
  • 900 ml water
  • 450 g sugar per 600 ml juice
  1. Place the fruit and water in large cooking pan. Bring to the boil. Reduce the heat, and let the fruit simmer gently for 20 minutes.
  2. Mash the content of the pan, so the fruit breaks.
  3. Place a jelly bag suspended over a large bowl.
  4. Pour the mashed fruit/water into the jelly bag.
  5. Leave until, the bag has stopped dripping. Alternative night over.
  6. Prepared the jelly glasses. I add boiling water to the glasses, while other will heat the glasses in the oven at 120 minutes.
  7. Measure the amount of fruit juice and weight out 450 g sugar per 600 ml juice.
  8. Pour the fruit into large cooking pan and heat up the juice to the boil.
  9. Add in the sugar, Stir until the sugar is dissolved.
  10. Bring the jelly mixture to a rolling boil (the jelly mixture has a lot of boiling foam on top).
  11. Let it boil for 4 minute as starting point.
  12. Test for a set after 4 minutes using the flake test (how the jelly is dripping from the cooking spoon). This is tricky, otherwise set, if the temperature is 104'C.
  13. When the the texture is right, remove the cooking pan from the heat. Start right away to remove any scum from the surface of the jelly, using a large metal spoon.
  14. Pour the jelly into glass jars, fill the jar to the top. Again remove any scum from the surface using a tea spoon.
  15. Seal the jar with a lid.
  16. Leave the glass upright and undisturbed to set.
  17. Store at ambient temperature. 

July 26, 2019

Rhubarb-strawberry gin tonic


A good start to the week-end could be to enjoy a gin tonic ! A combination of rhubarb and strawberry is quiet common, when making jam, so why try this combination in a gin tonic, as it is possible to buy both rhubarb gin as well rhubarb tonic ?

Rhubarb-strawberry gin tonic: - 1 cocktail
  • 6-9 cl Harrington Rhubarb Gin
  • 4-6 fresh strawberries - cut into several pieces
  • Fentimans pink rhubarb tonic
  • ice cubes
  1. Fill the gin bowl with strawberries, ice cubs and rhubarb gin.
  2. Fill the remaining part the gin bowl with pink rhubarb tonic
  3. Cheers and enjoy the week-end

July 25, 2019

Knit shawl - fifth progress


Getting closer and closer towards the end of this knit shawl, I am now knitting with the sixth yarn colour, and the shawl becomes longer and longer. And as you can see, I have now moved from the blue colour palette to my favourite colour palette of green.

July 24, 2019

Red & black currant jelly - preparing for Christmas


Today is the 24th July, so there is 5 months to Christmas Eve and the classic Christmas dinner, which for many Danes involved preparing and eating duck or goose.

A trick to get a good flavour in the sauce for the duck/goose is to add into red currant jelly to boost the flavour. The jelly on it´s own is also a great item for serve together with duck/goose and game in general.

It is the season for picking currants in the garden right here and now in Denmark, so now you can actually start your very first Christmas preparation for the Christmas of 2019 !!!

I learned to make this jelly with both red & black currant last year, when I participated in this Summer preserves course.

As my garden is very small, I was lucky to "source" the red currants from a work colleague garden and the black currants I could pick in the garden of my good friends in Horsens.

I will also make a twist to this jelly recipe using a combination of all currants (black, red and white currants), so look by in the near future to see this recipe.

July 23, 2019

Raspberry vinegar - new portion


The raspberries are ready to be picked in my garden. Typically you will can use raspberries for various types of raspberry jam: (rhubarb-raspberry jamraspberry jam with star aniseraspberry jam with rosemar & claissic raspberry jam).

Instead of you can use your fresh raspberries from your garden to make raspberry vinegar. This fruit vinegar is perfect for use on your salad.

July 22, 2019

Knit shawl - fourth progress


I keep knitting on my new knit shawl every time I sit watching TV, so I can it get for. when the cold weather will arrive at some time here in Denmark.

And was you can see, the colour pattern have now moved from the blue colour pattern towards the green colour range. And as you know, green colour is my favourite colour :-)

July 21, 2019

Blackcurrent jam


I have made my first visit to the garden of my good friends in Horsens, while they were away on Summer vacation, to pick both black currant as well as white current, which I afterwards have turned into jam in form of this black currant jam and rhubarb & white currant jam.

I used my jam book to locate a this recipe on black currant jam. As other suggestions on black currant you can also have a look at these suggestions (classic blackcurrant jam with twist of balcamicoblackcurrant jam with liquorice lemon and blackcurrant jam).

After the first filling of the jam into the jam glasses; I noticed that the jam did not gel. I think it was, because I had not boiled enough of the water in connection with the first boiling of black currant and water, where I boiled these two ingredients under lid.

Therefore I decided to empty all the jam glasses into the cooking pot and boil the jam again to remove more water from the jam to increase the dry matter, so the natural pectin of the black currant to gel the jam. And this project worked out very well for me, as after the second boiling them black currant jam did gelled in the jam glasses.

Blackcurrant jam: - 6 glasses
  • 800 g black currant
  • 675 ml water
  • 1.12 kg sugar
  1. Prepare the blackcurrants by washing the blackcurrant, removing the berries from the strings, removing leaves and removing the dead flower end.
  2. Place the blackcurrants in a large cooking pan and pour in the water. Bring the fruit to the boil, and let fruit simmer gently, until the fruit is tender, approx 25-30 minutes. REMEMBER to boil the fruit without the lid on the cooking pot.
  3. Prepare the jam glasses either by heating up in the oven or adding boiling water to them.
  4. Add the sugar into the fruit mass and stir until it is dissolved.
  5. Bring the jam to a rolling boil and boil hard until the setting point is reached. Stir the jam frequently.
  6. Test of set after 5 minutes using the flake test.
  7. When the setting point is reached, remove the pan from the heat and leave it to stand for 5 minutes. As the jam settles, push any scums from the surface of the pan to the side and remove it with a metal spoon. The purpose for the waiting step is well to build viscosity in jam, so the fruit pieces will be trapped inside the jam inside of be going to the top of jam.
  8. Gently stir the jam after the resting time and pour it into the prepared glasses, fill the glasses up to the brim. Remove any scum for the surface of the jam using a tea spoon. Close the glass with a lid.
  9. Leave the glass upright and disturbed to cool and set.
  10. Store at ambient temperature.

July 20, 2019

Knit shawl - third progress


My knitting project in form of this knit shawl is making fast progress, so my shawl will be finished quiet soon, so it ready for, when the cold weather once again will arrive here in Denmark.

I have made progressed away from adding more knit masks into reducing the amount of masks. The reduction is done at every 4 knit row, while the addition of knot masks was done at every 2 knit row. 

July 18, 2019

July - what's up


July - what's up

July is the second month of Summer here in Denmark, and a Danish Summer can be anything from rain over wind to sunshine. So fare it has been an average Summer.

Here in July various berries plays a big role, so you can either buy local produced berries in the supermarket, at small booth along the roads or perhaps just walk into your own or neighborough's  garden to pick fresh berries.


If you have plenty of strawberries you can make this strawberry jam, where apple is used to gel the jam. You could make this strawberry jam with elder flowers.


Another great tasting jam is this gooseberry jam


Besides from jams you can also make jellies like red & black currant jelly, which you can consider as the very first preparation for Christmas 2019 !!!!


Raspberries can either be used for raspberry vinegar or raspberry jam.

I hope you will look by my kitchen from time to time here in July to see, what kind of activities are taking place in my kitchen or in the garden :-)

So fare I have been the following stuff involving Summer berries in my little kitchen here in July:

July 17, 2019

Knit shawl - second progress


The knitting  of this knit shawl is really moving fast forward, so I will for sure have a nice knitted shawl, when the colder season of both Autumn and Winter arrives here in Denmark.

It is the first for me, that I am actually knitting with my kitchen weight next to me, as I have weigh the yarn to check, when I have 10 g of the colour left, as I at this stage have to introduce the next colour.

And I am still in the process for adding more and more mask to the shawl.

July 09, 2019

Knit shawl - first progress


The knitting process of the knit shawl in seven different colour is moving forward. It always helps to have a weeks vacation and that the pattern is very simple. I only have to remember to increase the amount of knit masks on very second row. On top of this I also have to weigh the amount of yarn, as you have to start using two colours, when there is 10 g left of the first colour. Besides from these two things, it is a very simple knit pattern.

July 01, 2019

Lønnestræde elderflower cordial with less bitterness


It is this time again of the year, where you in Denmark can make your own elder flower cordial. Many Danes are actually making their own elder flower cordial, some you can quiet frequently during this time experience, that your local supermarket runs out of citric acid !!!

I have fine tunes this recipe on elder flower cordial to get less bitterness from the citrus fruits into the final cordial. So this year I have peel out the skin of both the lemon & lime. When I cut of all of the white citrus layer and thrown all the white stuff away. And final I have sliced the remaining part of the citrus fruits. So I am still using the citrus peel as well as the inside of the citrus fruits for flavour and taste. The majority of the bitterness is sitting in the white part of the citrus skin.


Elder Flower Cordial a la Lønnestræde with less bitterness:
  • 40 elder flowers
  • 2 lemons - organic - peeled, white skin removed and fruit part sliced
  • 4 limes - organic - peeled, white skin removed and fruit part sliced
  • 40 g citric acid
  • 1.5  kg cane sugar
  • 2 l water - boiling
  1. Shake the elder flowers very, very well, so they are free from various insects. DO NOT use water for this cleaning step, as this will reduce the wonderful taste of elder flower significantly as you remove the "yellow" flavour dust/pollen.
  2. Use a scissors to cut the flowers from the flower stem, as these apparently will increase the bitterness level in the final cordial.
  3. Place the elder flower into a big bowl, which you can close with a lid at the end.
  4. Peel the citrus fruits. And the peel into the bowl.
  5. Cot of the white part of the skin layer (gives bitterness) and cut the remaining part of the citrus fruit into thin slices. Add into the bowl.
  6. Add the cane sugar on top
  7. Add the citric acid as well.
  8. Add the boiling water into the bowl.
  9. Stir the sugar into solution, so it does not form a sediment on the bottom, which is difficult to dissolved later, when the cordial is cold.
  10. Cover the bowl with the lid.
  11. Let the content cool down to room temperature, before you place the bowl in the refrigerator.
  12. Stir or shake the bowl daily during the infusion time.
  13. Let the elder flower cordial infuse for 4 days in the refrigerator.
  14. Sieve the cordial to remove all the different ingredients.
  15. Prepare the glass bottles by by filling them with boiling water. I do not use any preservatives, so this is important to increase shelf-life of your cordial.
  16. You can also use plastic bottles, if you want to freeze the cordial as another way of preserving it. Remember NOT to fill these bottles completely, as liquid will increase in volume, when turning into ice.
  17. Enjoy the wonderful Summer time using this cordial as "plain" cordial mixing with water (with or without gas), mixing with wine or sparkling wine. Or mix it gin or vodka and lots of ice.