May 31, 2011

Cabbage pie with curry


Finally I have found a recipe, which I actual like using the cabbage, which I get on a very regular basis in my weekly vegetable box. Normally I have used the cabbage in salad together with goat cheese, walnuts, tomatoes and a dressing of apple vinegar or pomegranate balcamico.

So this pie I have now being making and baking for a couple of times. And I have been using it for easy evening meals, in lunch boxes going with me to work or going rowing.


This pie is another modification recommended in the weekly newsletter from Årstiderne for week 31/2010 Årstiderne's weekly newsletter 31/2010 on the broccoli pie with goat cheese. The first modification  is using using cauliflower together with goat cheesein the cauliflower pie with goat cheese


I decided to use ready-to-use pie dough in combination with baking the pie in one go, so NO pre-baking of the pie dough this time !!!! And it is giving a very good result comparing to the pre-baking of the ready-to-use dough, which I did, while making the cauliflower pie. 

Cabbage pie with curry - serves 4


Ready-to-use pie dough
Cabbage filling:
  • 1 cabbage 
  • 2 teaspoons of strong curry - I like a good strong taste of curry
  • oil for frying 
  • 5 eggs
  • 1½ dl milk
  • 100 g Emmentaler cheese
  • salt & pepper
  1. Heat the oven to 200'C
  2. Cut the cabbage into small pieces.
  3. Heat the oil in a frying pan.
  4. Fry the curry in the oil for a good strong curry taste
  5. Fry the cabbage in the curry oil until it "falls down"
  6. Place the pie dough in the pie form
  7. Fill the cabbage into the pie form
  8. Whip eggs and milk together
  9. Season with salt and pepper
  10. Add this filling into the pie form on top of the cabbage
  11. Top up with the Emmentaler cheese
  12. Bake the pie at 200'C for 30 minutes until the egg filling is stiff

May 30, 2011

Hurra - I have won a cook book :-)))

Hurra - I was informed yesterday evening, that I have won a cook book as a give away on the blog called Anne´s Food. I am really looking forward to receive this cooking book :-)

http://annesfood.blogspot.com/2011/05/and-cookbook-winner-is.html

Cauliflower pie with goat cheese


Cauliflower is NOT one of my favourite vegetable, so I am always on the outlook for recipes, where I can use cauliflower, when I am unluckily to get cauliflower in my weekly vegetable box. This time I tried a modification recommended in the weekly newsletter from Årstiderne for week 31/2010 Årstiderne's weekly newsletter 31/2010 on the broccoli pie with goat cheese using cauliflower instead of broccoli.

Compared to the last time, when I made this pie with broccoli certain modification was applied. I increased the amount of goat cheese from 100 g to 150 g, which still did not give me and my taste buds enough goat cheese flavour.

Honestly, this recipe is NOT going to one of my favourite. Yes, I will eat the pie, but I will NOT make it again !!!!!!!!

I also increased the oven temperature from 175'C to 200'C, and this worked perfect for the pie in my oven.
And YES I did decided to crawl under the fence, where it has it's highest point = I did not make the pie dough myself, I used a commercial ready-to-use pie dough !!!!! And I feel OK doing so, as the alternative for me was not to make this pie at all !!!!!

Cauliflower pie with goat cheese - serves 4

Pie dough:
  • 100 g rough spelt flour
  • 150 g wheat flour
  • 125 g butter
  • 1-2 tablespoons water

Cauliflower filling:
  • 1 broccoli
  • 5 eggs
  • 1½ dl milk
  • 4 tomatoes
  • 150 g goat cheese
  • salt & pepper
  1. Add the flour to a mixing bowl.
  2. Cut the butter into small squares and add it to the flour
  3. Mix butter and flour together to a homogeneous mass
  4. Add the water and knead the pie dough together
  5. Let it rest for 30 minutes in the refrigerator OR just use a ready-to-use pie dough from the supermarket.
  6. Roll the pie dough into a shape fitting with the pie form and fit the dough in this form
  7. Cover the pie dough with baking paper and put pie weights on top
  8. Bake at 200'C for 20 minutes
  9. Meanwhile make the pie filling
  10. Cut the cauliflower into small bouquets
  11. Heat water to the boiling point, add the cauliflower and cook it for 1 minute and drain away the water
  12. Whip eggs and milk together
  13. Add cauliflower and goat cheese (cut into smaller pieces)
  14. Season with salt and pepper
  15. Add this filling into the pie form with the baked pie dough
  16. Slice the tomatoes and cover the pie with these tomato slices
  17. Bake the pie at 200'C for 30 minutes

May 29, 2011

Rhubarb Tiramisu


I have found this fantastic recipe on rhubarb tiramisu out here in blog country on a blog called "Life of la Tascha" rabarbertiramisu med hindbær. And I have the recipe as it is without making any modification to it.

As rhubarb cordial and rhubarb I have used my own home-made rhubarb cordial a la Årstiderne. I did not mix the rhubarb cordial with water, before using it.

As I was having guests coming in for a birthday coffee, the rhubarb tiramisu did not get all the time needed for resting between preparation process and the actual eating process, so the structure was not firm enough, but the taste was just great. It had around three hours of resting time, I believe it would need four-five hours instead of.

 Rhubarb tiramisu: by Life of la Tascha
  • 10 lady fingers
  • 2-3 dl rhubarb cordial
  • 3 pasteurised egg yolks
  • 1 dl sugar
  • 250 g mascarpone
  • 2 dl whipping cream - 38% fat
  • 150 raspberries - fresh or frozen
  • 50 g icing sugar
  • juice of ½ lemon

  1. Place the lady fingers in the serving dish.
  2. Pour rhubarb cordial over them.
  3. Whip the egg yolks with the sugar into foam.
  4. Add the mascarpone into this, I used an electric whipper, so the mass became homogeneous
  5. Whip the whipping cream to foam, not too stiff
  6. Mix the whipping cream and mascarpone-egg cream together.
  7. Cover the lady fingers with the cream
  8. Add the rhubarb compote on top of the cream
  9. Finally cover the rhubarb compote with the rest of the cream
  10. Store the rhubarb tiramisu in the refrigerator
  11. Let it rest for 4-5 hours before eating it, so it has time to firm up.
  12. Meanwhile make the raspberry sauce.
  13. Blend the raspberries (defrosted the raspberries in the microwave oven, if you use frozen raspberries).
  14. Mix icing sugar and the lemon juice with the blended raspberries
  15. Use the raspberry sauce as topping on the rhubarb tiramisu to get some colour.
  16. Eat and enjoy, uuuhhhhmmmmm :-)

Ramson pesto with walnuts


Sharing this recipe with you has taken a very, very long time !!!! And it is no longer season for finding ramson in the forest. I have been looking at various recipes on ramson pesto out here in blog country without finding one to use as the majority write nothing about the specific volume between the different ingredients. As a first time pesto novice it is important to start knowing the ratio between the different ingredients, before you can start to make your own adjustments !!!!

I found this recipe on ramson pesto on the blog by Mira Arkin: ramsløg pesto a la Mira Arkin


Ramson pesto by Mira Arkin:
  • 1 big hand full of ramson - 50 g ramson leaves
  • 30 walnut kernels
  • 30 g freshly grated Parmesan
  • ½ dl oil - I used rasp seed oil
  • salt & pepper
  1. Wash and dry the ramson
  2. Add them to the blender together with walnut, Parmesan and oil
  3. Blend everything together
  4. Season with salt and pepper
  5. Store either in the refrigerator or in the freezer, if you will not use this pesto at once


May 28, 2011

Perfect birthday dinner - eating at Latin in Århus


After two birthday arrangements, where I was busy making various food as well as baking bread and cakes, it was finally my tour to sit back and let someone else taking care of the cooking. So together with a good working colleague/friend we went to Latin in Århus for a shared birthday dinner.

It was a perfect place to eat. The food was excellent. You can see, how the two chefs are actually working in their corner of the restaurant and the waiter was doing a very nice job.


We started with a glass of cremant infused with orange liqueur as a good start of celebrating our two birthday in common.

Together with bubble appetizer we were served a basket with bread rolls and aioli.
As starter I had chosen poached egg served on top of white and green asparagus as well as tomatoes. Smoked cheese was a part of this starter culture. Luckily not to dominating, as I still need to mark on my mind, if I like smoked cheese or not. Here it was perfect.
As main course I went for the fish version, which was halibut served on top of herb risotto. It was very tasty :-)
It took me no time to decided, what kind of dessert, I should have. As always I went for the rhubarb version. Rhubarb sorbet, very light rhubarb foam and a rhubarb panna cotta covered in thin slices of fresh (non cooked) rhubarb. Uuuuhhhhmmmmm

My final Easter egg


During my last business trip to Paris, which took place right after Easter, I visited a chocolate shop called Marquise de Sévigné, which had 40% discount on all their left-overs from Easter. Here you could either buy Easter egg in chocolate or in French nougat. As I had to flight back to Denmark with the Easter egg, I decided to go for the French nougat version, so it would not be crushed during the travel.

So I am enjoying my final Easter egg with 200 g of French nougat :-) which is coming to an end with nothing left.

May 27, 2011

Meringue dream with rhubarb foam and sweet berries


For my birthday brunch last week-end I decided to make a birthday cake in form of a meringue dream with rhubarb foam and sweet berries. I found this recipe in the Danish magazine called Isabella - spring 2011.

The main attraction for me was the use of rhubarb !!! as well as the fresh fruit. I decided to twist the meringue cake with addition of orange flower extract.

Meringue dream with rhubarb foam and sweet berries:


  •  4½ egg whites - pasteurised
  • 200 g sugar
  • 1 tablespoon orange flower extract
  • 200 g almonds with peel - blended to flour
  • 300 g rhubarb
  • 160 g sugar
  • 1 tablespoon potato flour
  • 1 vanilla pod
  • ½ l whipping cream - 38% fat
  • 500 g mixed fresh berries
  1. Heat the oven to 175'C
  2. Blend the almonds incl their peel to flour
  3. Whip the egg whites stiff
  4. Add the sugar, whip the foam stiff again
  5. Add the blended almonds in the foam
  6. Add the foam into a round form, 26-28 cm, coated with baking paper.
  7. Bake the meringue at 175'C for 20-25 minutes
  8. Cool the meringue
  9. Cut the rhubarb into 2 cm pieces.
  10. Cover a oven stable dish with baking paper.
  11. Add the rhubarb, sugar, potato flour, vanilla corn and the vanilla pods into the oven stable dish.
  12. Bake the rhubarb mix at 175'C for 20 minutes
  13. Cool down, remove the vanilla pod, and mix the rhubarb into a homogeneous mass.
  14. Whip the whipping cream into a stiff foam.
  15. Mix the rhubarb foam together the whipped cream.
  16. Add the rhubarb-cream foam on top of the meringue cake
  17. Decorated the cake with different type of fresh fruit like strawberries, raspberries, blueberries.


May 26, 2011

Egg "en cocotte"


Instead of the usual scrambled egg and bacon, which is so typical on the brunch table everywhere, I decided to make egg "en cocotte" using inspiration from Tupperware. It is a dish, which is very, very easy and simple to make, and it incorporates egg and bacon into on single dish

Egg "en cocotte": - serves 7
  • 7 egg
  • 4 cherry tomatoes
  • 7 slices of bacon
  • 7 fresh leafs of basil
  1. Heat the oven to 200'C
  2. Cover each hole in the Tupperware silicone muffin form with one slice of bacon
  3. Break the shell on the egg and pour one egg into each bacon covered muffin hole
  4. Cut the cherry tomato into 4 part each, use 2 slices of tomato for each muffin hole
  5. Decorate each muffin form with a leaf of basil
  6. Bake the egg at 200'C for 20 minutes
  7. Cool down the egg before removing them for the muffin form
  8. Enjoy your breakfast

May 25, 2011

Birthday gift from some lovely work colleagues


Two lovely work colleagues have been making my birthday more shinny and sunny with their little thoughtful gifts to me :-))

From one work colleague I got a pack with two cream puffs from Chokolade-Fabrikken together with a tea called the Dream Tea uuuhhmmmm :-)

From the other work colleagues I got two Estonian gifts, some dark chocolate with green tea and mint called Marrakesh Mint together with an un-eatable Estonian Chanel style flower in purple. I believe she know my favourite cloth colour to well !!!!

Thank you very much ladies :-)) I will eat, drink and dress my self using your nice birthday gift

New tea for my tea cup 7


As I have emptied my "little" collection of tea tins for tea, I need to fill them again with some new teas. This time I have found a tea from Mariage Frères called Nil Rouge, which is rooibush tea with fruit and lemon. This tea has a refreshing summer flavour, which is not offend anyone.

May 24, 2011

Cappuccino cake


"Hjemmebagt" - 73 recipes - 10 accomplished = 63 recipes to bake


As the "final" celebration of my birthday, where I had to play an active role in my kitchen, I baked this cake for sharing with my colleagues at work.

It is the Cappuccino cake from the baking book called "Hjemmebagt".

I spend 5 minutes on whipping the cake base using an electrical whipper, as it should be foamy and glossy looking.

I followed the recipe using the exact stated single ingredients in the actual volume. Afterwards I am questioning myself, if the volume of both cocoa powder and cappuccino are correct in the baking book or if a 0 is lacking !!! In the recipe is states 4 g cocoa powder and 10 g cappuccino powder.

My colleagues and I could have used, that the cake actually was tasting of cappuccino instead of sweet taste.

So I think, I need to contact the author of this baking book, to clarify these ingredients volumes.

While I was busy baking the cake, Hannibal the Cat decide to use the suitcase of friend as sleeping position :-)

May 23, 2011

Guldbrød med cider / Gold Bread with cider


"Hjemmebagt" - 73 recipes - 9 accomplished = 64 recipes to bake

The speed of my baking progress through "Hjemmebagt" has suddenly improved from 0 recipes per week in a long time to 3 recipes in  one day !!!!

This Guldbrød/Gold Bread requires some planning, as you are working with a pre-dough, which requires 12-24 hours resting at low temperature, before actually making the final bread dough. The dough also require addition of cider, which was a little tricky to find among the many cider products designed for drinking by very young people or should I just write teenagers/children. I managed to find a raspberry cider produced by Ørbæk for adults !!!

The bread taste great as it is based on cider, water, whole grain wheat flour and "normal" wheat flour.

May 22, 2011

Landbrød med hvedeknæk / Country bread with wheat kernel


"Hjemmebagt" - 73 recipes - 8 accomplished = 65 recipes to bake

A busy day with my birthday brunch for family and friends as well as baking a total of three recipes from the baking book "Hjemmebagt" - two different bread and one cake to be used as birthday cake for my colleagues tomorrow at work.

For the brunch I baked this country bread with wheat kernel, fresh apple, yogurt and wheat kernels and of cause whole grain wheat flour and "normal" wheat flour. The wheat kernel are left to soften for 12 hours before hand, using boiling water as a starting point). It is a very nice bread, where the recipe provide you with two loafs of bread.

So now I will relax with a nice cup of tea and a left-over cookie with raisins and almonds.

May 21, 2011

Getting ready for birthday brunch tomorrow


Ready, steady and go - go with the wheelbarrow with food for tomorrow birthday brunch. Easy and CO2-friendly transport from my kitchen to the location next door.

The menu for the birthday brunch is:

Home-made muesli


I will serve home-made muesli for the home-made yogurt at my birthday brunch tomorrow, so yesterday evening I made this home-made muesli, where I have found the recipe in Alt for Damerne 15/2011, with a few modifications:


Home-made muesli: 
  • 1 tablespoon coconut oil
  • 2 tablespoons agave syrup
  • 2 teaspoons cinnamon
  • 150 g oat flakes
  • 2 dl barley flakes
  • 2 dl almonds - grounded
  • 2 dl walnuts - grounded
  • 2 dl sunflower seed
  • 2 dl sesame seed
  • Dried cranberries
  • Dried raisins
  1. Heat the oven to 170'C
  2. Ground the almonds and walnuts
  3. Spread the grounded nuts, oat and barley flakes, sunflower and sesame seeds on a baking tray covered with baking paper
  4. Mix everything together
  5. Melt the coconut oil and agave syrup together with low heat on the stove.
  6. Add the cinnamon to this mix.
  7. Add the oil-syrup mix over the grain mix and mix everything together.
  8. Roast the muesli in the oven at 170'C for 10 minutes.
  9. Let the muesli mix cool down.
  10. Add the dried fruit in form of cranberries and raisin to the muesli mix
  11. Fill the muesli into storage containers.

May 20, 2011

Cookies with raisins and almonds a la Isabella


Ready to take a bit of this cookie ?
I just loved home-made American style cookies !!!! I prefer my cookies to soft and chewy, and have less of a preference for over-baked and dry cookies.

I found this recipe some years ago in a Danish magazine called Isabella. I cutted it out of the magazine and limed it into my private personalised cooking book.

Cookies with raisin and nuts a la Isabella: 18 cookies

  • 150 g butter - soft
  • 150 g sugar
  • 1 egg
  • 200 g flour (cake flour)
  • 1 tablespoon vanilla sugar
  • 1 teaspoon baking powder
  • 50 g almonds or hazelnuts - minced
  • 200 g raisins

  1. Heat the oven to 200'C
  2. Whip butter, sugar and egg together using an electric whipper
  3. Add vanilla sugar and baking powder and whip
  4. Add flour ans whip
  5. Ground the nuts
  6. Whip in the raisins and minced nuts
  7. Use two spoons to place the cookie dough on the baking tray covered in baking paper. Keep a good distance between the individual cookies.
  8. Bake in the oven at 200'C for 12-15 minutes
  9. Cool down before serving
  10. Taste and say uuuuhhhhmmmm :-)

Rhubarbe Royal


Taking inspiration from my favourite champagne/crémant drink Kir Royal (crème de cassis (blackcurrant liqueur) with crémant), which I drink on regular basis, when I am in Paris as appetizer, I decided to create my own Danish version.

Rhurbarbe Royal:

Wheat buns (varme hveder) for the Great Prayer Day Evening


The Danish holiday called Store Bededag, translated literally as Great Prayer Day or more loosely as General Prayer Day is celebrated on the 4th Friday after Easter. One of the Danish Kings decided to collect a selection of small Christian holy days into one big day called Store Bededay, so the Danes would have more working days.
There was very few traditions associated with Store Bededag. Traditionally, the citizens and students of Copenhagen strolled on the city ramparts on the evening before Store Bededag. The students of of Copenhagen University did this in honour of the many students that died defending Copenhagen during assault on Copenhagen. Another tradition on the evening before is to buy and eat 'varme hveder', a traditional bread. This comes from the fact that bakers were closed on holidays and people bought bread for the following day.

Today we only have the tradition of eating "varme hveder" left and this done Thursday evening before the actual holy day Friday.

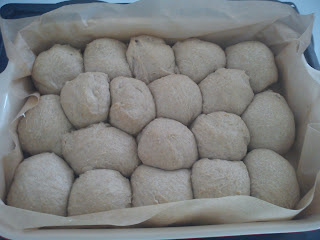
So as I was having guest coming for birthday coffee yesterday evening I decided to make my very fist tempt on baking my one wheat buns instead of going to the baker and buy those.

Guess what - they tasted JUST GREAT compared to the baker's version. And the taste of cardamon was perfect.

I decided to use the recipe from the cooking book called "Meyers Bageri" by Claus Meyer with certain adjustments.


 Wheat buns a la Claus Meyer:
  • 2½ dl water
  • 2½ dl milk
  • 2 eggs
  • 10 g yeast
  • 15 g salt
  • 50 g sugar
  • 15 g grounded cardamon
  • 50 g butter
  • 900 g flour - as I use a ration of 700 g liquid to 1000 g flour
  1. Weigh the milk, water, egg and melted butter in the mixing bowl. The amount you need to know in order to calculate the amount of flour need to make the dough.
  2. Add yeast, sugar and cardamon into the liquid part.
  3. Add the flour.
  4. Knead the dough. Here I am also using my interpretation of the Richard Bertinet method. I knead on time - 10 minutes - as I know, that I will to soon otherwise.
  5. Raise the dough cold night over - I always place my dough (in the mixing bowl with a lid on) outside the kitchen door, as it is facing north.
  6. Rework the dough - scale each wheat bun to weigh around 80 g - so you get an even baking time for each bun
  7. Place each bun in a roasting pan - let the buns raise for another 2 hours - and they will "grow" together.
  8. Bake the wheat bun at 220'C for 15-20 minutes, please be aware of, the wheat bun in middle could use more baking time.
  9. Cut the wheat bun into 2 pieces - lets those roast at 200'C for 6-8 minutes
  10. Served hot or cold together with butter - plenty of butter - cheese, jam, coffee and tea.

May 19, 2011

Rower friendly birthday gift

Yet a wonderful evening in the company of some very good rowing friends :-)) These Danish spring evenings, where the birds are giving a superb concert outside, while the evening colour turns more and more blue as the hours runs away on the clock. This is when I fully appreciate, that I living in this little country called Denmark in Scandinavia.

It is always with great pleasures for me, when my coffee drinking guests say, that they are looking forward to taste and drink the teas, which I have in my kitchen.

I am received two lovely birthday gifts. A bag of Darjeeling First Flush Gielle (FTGFOP-1) and a fast-drying towel for many coming rowing tours to dry my feet after a landing at the beach.

Thank you  rowing friends for your company and the birthdays gift :-))

LinkWithin

Related Posts Plugin for WordPress, Blogger...