October 31, 2012

Scones with apple and walnuts a la Baking Mad

Apple-walnut scones
I saw an add 1½-2 years ago in Country Living about the baking home-page called www.bakingmad.com, where this recipe on scones with walnut and apple was featured. For some reason I get this scone combination in mind for testing out in my own kitchen. And the PINK fund raising afternoon tea turned out to be this opportunity to do it.

My evaluation of this recipe after my sensory evaluation and discussion with my good girl friend from Horsens, who also is a scone lover like I, is, that the recipe NEEDS more butter instead of the tiny amount of 40 g !!!! And replacement of the milk with buttermilk, could also be another interesting twist to this recipe, and a pinch of salt as the finishing touch. The combination of walnut and apple is excellent, but more butter please :-)))

Scones with apple and walnuts a la Baking Mad: - 10 scones

Scones ready for baking
  • 225 g (cake) flour
  • 1 teaspoon baking powder 
  • 40 g (cold) butter - diced
  • 1½ tablespoon sugar 
  • 25 g walnuts - chopped
  • 150 g milk
  • 1 apple - cored, peeled and diced
  • 2 tablespoon sugar - for sprinkling before baking
  1. Preheat the oven (conventional) to 225'C
  2. Mix the flour, baking powder and sugar together in a mixing bowl.
  3. Cut the cold butter into small pieces.
  4. Grind the butter pieces into the flour mix. 
  5. Add the chopped walnuts and apple pieces into the flour mix, stir well
  6. Pour in the milk, stir well without without kneading it into a dough.
  7. Place the dough on a pieces of baking paper.
  8. Flatten the dough into a height of 2 cm.
  9. Use a glass to cut out scone pieces.
  10. Re-roll the dough and cut again, until you have used all of the scone dough.
  11. Place the scones a baking tray covered with baking paper and sprinkle them with sugar.
  12. Bake the scone at 225'C for 12-15 minutes.
  13. Serve the scones together with whipped cream and jam

October 29, 2012

Lønnestræde Kir Royal

Lønnestræde Kir Royal
Life is to short to say no to glass of sparkling wine, I just love wine with bubbles in-side :-)
And I always find that serving a glass of sparkling wine either plain as the wine itself or combined with something extra as starter to an occasion is giving that extra spark to some great hours in each other´s companies. So join in and enjoy sparkling wine so much in your daily life.


Lønnestræde Kir Royal:
  • 3-4½ cl home-made blackcurrant rum - 3 cl for twist of the taste - 4½ cl for blackcurrant flavour
  • Cold crémant or sparkling wine to fill the glass
  • Let´s celebrate !!!!

October 24, 2012

PINK fund raising afternoon tea

PINK afternoon tea table is ready for the guests

MEGA - MEGA MANY THANKs to all of my amazing girls friends, who took part in this pink fund raising afternoon tea for their generosity and positive response to my invitation.

Together we collected 600 DKK, which has been transferred to www.araceagainstbreastcancer.dk, as this charity is accepting any amount of money without demands to specific value.

The afternoon started with a glass of bobbles in form of my interpretation of Kir Royal, mixing sparkling wine with blackcurrant rum.
Welcome - Lønnestræde Kir Royal
As small appetisers I used mini toast bread. One option being the traditional egg salad and the second option having a more French character of French soft goat cheese and French lavender jam (Fleurs de Lavande).
Mini toast with French goat cheese and French lavender jam

Mini toast with traditional egg salad
Next point on the afternoon tea agenda was apple-walnut scones served together with whipped dairy whipping cream and blackberry jam with lemon and balcamico. These scones could have needed some more butter, as they were a bit to the dry side.
Apple-walnut scones with whipped cream and blackberry jam
The cake part of the menu consisted of three different cakes.

The first cake being raspberry cake using the bottom part of the strawberry cake version 3.0, a too, too thin vanilla cake cream found in the bread book "Hjemmebagt" and freshly picked Autumn raspberries from the garden of my very good friends in Horsens.
Raspberry cake with bleeding vanilla cream
The second cake being a "mini" cheese cake with liquorice and lemon overloaded with enormous amount of calories.
Liquorice-lemon cheese cake
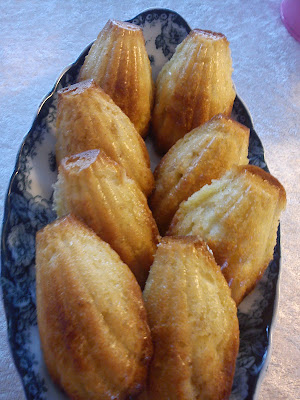
The third cake being Madeleines
Madeleines
As a finishing touch I served a fruit selection, where I forgot to take a picture.

Everyone was filled up more than 100% in the stomach after the afternoon tea, I had to skip the evening meal !!!!

Thank you for your support for PINK afternoon tea

October 22, 2012

Madeleinekager (Madeleines) from "Hjemmebagt"

Madeleines - shinny and fantastic taste
 "Hjemmebagt" - 73 recipes - 19 accomplished = 54 recipes to bake

Juhuuu - progress again !!! This time is only took me 14 days to bake a new recipe from the baking book "Hjemmebagt". And this time I have tested out a sweet recipe in form of Madeleines. This is very first time, that I have been testing my baking capabilities on such a cake recipe using my silicone Madeleine form for this very purpose, instead of making chocolate/marzipan sweets in it.

A little over-filled Madeleine form ready for baking
The recipe contains all the "goodness" in form of butter, sugar, flour, vanilla pod, lemon peel, lemon juice and pickled ginger. The dough tasted fantastic, and the smell from the oven was great and the Madeleine on it´s very own was just overly tasteful, uuuhmmm.

It is not the last time I making Madeleines, I could easily imaging twisting this recipe into a more Christmas type of Madeleine still using the pickled ginger.

I found, that you should NOT fill the Madeleine form to the very last inch, as the Madeleines will grow together during the baking process. However, these grown-together "vanished" at work today regardless of their sharp !!!

I would also like to thanking those of you, how voted on my apple contribution at the apple blog event on the Norvegian blog Matbloggsentral. The apple fish recipe got voted in on a top 19 out of 108 postings  combined with quiet many post views. It is amazing, the amount of traffic such a participation can attract. Thank you for your support - and I can promised it will not be my last participation in such a competition.

October 20, 2012

Preparing for PINK fund raising afternoon tea tomorrow

The invitation to my girl friends for the PINK afternoon tea

Tomorrow´s  PINK outfit
Today I am busy for preparing for tomorrow´s PINK afternoon tea, so I am just sharing some pictures with you of these preparations.

As some of you know, I involved my work colleagues in a PINK muffin fund raising recently, so now it is my girls friends being involved in similar activity.
After the good response from my work colleagues, I feel ready for yet another step out of my comfort zone in form inviting people to afternoon tea, where they would have to bring money instead of a more normal hostess gift. Again the donated money will be forwarded to "A race against breast cancer".

The motivating factor for making my own fund raising events is, that my grand mother and her sister both dead of breast cancer.


PINK being the colour of the afternoon tea


October 19, 2012

Please vote on my apple contribution at Matbloggsentralen

My apple harvest of 2012 - the BEST harvest ever from my garden
For the first time ever in the "life" of my blog, I would like to ask you to vote on one of my two contribution to the theme apple (EPLER in Norwegian) on the Norwegian blog collection Matbloggsentralen.

There is posted a total of 108 apple posts, and I have two contribution in form of the cake called "Æbel fisk" (Apple Fish) post number 28 and Paradisæbel Snaps (Crab apple aquavit) as post number 29. Looking at amount of post views on these two posts, if seems like the Apple Fish being the most popular, so I would be grateful for your vote on Apple Fish - you use this link Matbloggsentralen ukens utfordring epler. You can vote until Sunday 21 October 2012 at 24.00 CET.

I have an option winning a apron, if get the most votes. However, for me it is not the apron being the goal. The goal for me is to get a few votes on one of my blog posting.

Now you have three options:
  1. do what you normal would do - read this post and click away to something else.
  2. write a comment, why you dis-like bloggers begging for votes in blog competition.
  3. bring some extra happiness into my life by giving me a mouse click voting on one of my blog posts :-)
Have a nice week-end :-)

October 18, 2012

Soup of Jerusalem artichoke with dairy cream

Soup made from Jerusalem artichoke

A "fortune" in Jerusalem artichoke
If you have to buy Jerusalem artichoke in the supermarket, you can easily end up paying a "fortune" for these roots. People having the Jerusalem artichoke as plant in their garden will be more than happy to share the roots with you, as this plant very, very easily spreads it self.

So coming to work finding a big bag of Jerusalem artichoke just made my day, so a BIG thank you to a good working colleague for sharing his "treasure" of Jerusalem artichoke with me :-)

Another option you can try is soup of Jerusalem artichoke and mascarpone
UPDATE 3 November 2015:
This soup is being forward for the monthly blogging event Tea Time Treats having the theme of soups, borths and stocks. Tea Time Treast is managed by Karen from Lavender and Lovage and Jane from The Hedge Combers.


Soup of Jerusalem artichoke and dairy cream: - 3-4 servings
  • 500 g Jerusalem artichoke - peeled & chopped
  • 1 onion - peeled & chopped
  • 50 g butter
  • 1 dl white wine
  • 7,5 dl vegetable broth
  • 2,5 dl dairy whipping cream, 38% fat
  • Onion and Jerusalem artichoke enjoying themselves in butter
  • salt & pepper
  1. Peel the Jerusalem artichoke. Cut those into smaller pieces. Do similar with the onion.
  2. Melt the butter in a cooking pot.
  3. Add the chopped Jerusalem artichoke and onion, and it softly fry for 10 minutes without the vegetable turning brown in colour.
  4. Add the white wine and let it evaporate from the cooking pot.
  5. Add the vegetable broth and let the soup cook for 20 minutes, until the Jerusalem artichoke pieces are soft.
  6. Add the dairy whipping cream. And blend the soup together.
  7. Season with salt & pepper. Cook up to the boil.
  8. Serve together with bread.

October 16, 2012

Carrot bun with apricot

Carrot buns with purple carrots

I found this recipe on carrot buns with apricot in the weekly newsletter issue week 40/2012 from Årstiderne, and with the rain being everywhere, I decided to test these buns making a few adjustments of mine (more yeast, change the ratio between water and fermented milk product in favour of the milk product). A the colourful purple carrots are brining some colour to a grey day full of rain.

As fermented milk product you can use yogurt, buttermilk, fromage frais or A-38, so simply use what ever fermented milk product, which you have in your refrigerator.

I have a mix of carrots in form of white, yellow and purple carrot, which I decided to use instead of the usual orange carrot. After addition of the grated carrot, the dough change colour from the normal flour colour in more reddish colour. And these purple carrots are also providing some very nice colour in the final buns.

If my freezer is over-loaded, I some time keep some part of the bun dough cold in the refrigerator after the first raising for up to 1-2 days, before I raise the bun dough for 60 minutes, before baking the buns. Doing this, you can enjoy freshly bake buns for 3 days in a row.

The apricot is bringing a nice sweetness into the buns as extra taste. However, the taste profile still remains in the savoury direction.

Carrot bun with apricot: - 22 buns

The carrot bun dough
  • 250 g carrots - finely grated
  • 50 g dried apricot
  • 20 g yeast
  • 400 g water
  • 200 g fermented milk product
  • 15 g salt
  • 1000 g wheat flour

  1. Add boiling water to the dried apricot, let the apricot soak for 5 minutes.
  2. Chop the apricot finely.
  3. Peel the carrots and grate them finely.
  4. Add the flour into a mixing bowl.
  5. Mix the yeast into the flour.
  6. Add salt, fermented milk product, water, carrot and apricot.
  7. Knead the dough together, I usual knead for 10 minutes.
  8. After the kneading process, let the dough raise warm for 1½-2 hour.
  9. De-gas the dough and weigh the dough into 80 g pieces and form a bun.
  10. Place the buns on a piece of baking paper.
  11. Let the buns raise for 30-45 minutes
  12. Heat the oven to 200'C (conventional oven).
  13. Place the buns in the hot oven. Bake the buns for 20 minutes.

October 14, 2012

Apple muffin with cinnamon

Apple muffin before baking
This muffin recipe is my favourite muffin recipe having a perfect balace between fruitiness, seasoning in form of cinnamone and sweetness. These muffins are actually not very sweet in taste, so if you have a sweet tooth, you should consider to increase the sugar amount with another 25-50 g on top of the 115 g sugar.

These muffins are perfect for freezing (right after baking), drinking with tea or coffee or bringing with you on a rowing tour.

Apple muffin with cinnamone: - 14 muffins
  • 300 g cake flour
  • 1 tabelspoon baking powder
  • 1 tabelspoon cinnamon - yes, 1 tabelspoon !!!
  • 115 g sugar
  • 2,5 dl buttermilk
  • 1 egg
  • ½ dl oil
  • 200 g apple - peel and put into small square
  1. Heat the oven to 200'C (conventional oven)
  2. Mix cake flour, baking powder, cinnamon and sugar together in a mixing bowl with a cooking spoon
  3. Add buttermilk, oil and egg into a shaker, and shake it together
  4. Add the liquid to the mixing bowl, and mix everything together
  5. Add apple squares and blackberries into the dough
  6. Fill into 14 muffin forms
  7. Bake at 200' C for 20-25 minutes in the middle of the oven.

October 13, 2012

Rapeseed oil with chili and garlic

Warm coloured rapeseed oil
As my kitchen garden is closing down for the season of 2012, I decided to harvest all the chili from the the planted chili plant, which was planted in beginning of June 2012. I got a total of 12 chilies from this one plant, which is quiet OK seen in relation to the cold Danish Summer of 2012.

How to save these chilies in a different way instead of my usual way of freezing them down ? I decided to try to make "my" version of chili oil. Having goggled chili oil, I ended up being confused, should the chilies be cooked/heated before adding them to the oil or not ? Do you have any experience on this topic ?

I decided to play it safe by adding boiling water to the chilies, before adding them into the rapeseed oil.

Lønnestræde´s rapeseed oil with chili and garlic: - 250 ml bottle
The chili plant of 2012

  • 8 chilis - green stem removed and cut in half
  • 2 cloves of garlic - sliced
  • up to 250 ml rapeseed oil
  1. Remove the green stem from the chili and cut them into half. However, let the seeds sitting inside the chili.
  2. Add boiling water to the chilies, let the chilies remain in the hot water for 5 minutes.
  3. At the same time add boiling water to the storage bottle.
  4. Empty the glass for boiling water. Add the chilies into the glass bottle together with the sliced garlic cloves.
  5. Fill the glass bottle with rapeseed oil.
  6. Store the bottle in dark, so the oil does not oxidated.
  7. Let the bottle stand for 2-4 weeks, before you start to use this oil.

October 11, 2012

"Pink" muffin fund raising at work

Muffin fund raising uniform
First of all a BIG thank to all of my fantastic work colleagues, who participated in this muffin fund raising event for the fight against breast cancer :-) as well as their positive response to this idea of mine.

In October month there is a lot focus here in Denmark (like many other places in world) on breast cancer as well as collecting money to support both research in this sickness as well as support to women living with it.

So besides from buying the yearly T-shirt, I took the decision of involving my work colleagues as well in form of a PINK muffin fund raising at the afternoon coffee based their previous great support to such a crazy idea of mine. And this time I felt much better making such a fund raising selling home-made blackberry muffin, as I once before tried to step out of my comfort zone "demanding" money for eating my muffins.

I looked into there the collected money could be donated. One option would be "Støt brysterne", but here the amount of money need to fit with 50 DKK - 100 DKK - 150 DKK etc, which would be tricky in my case, as I would not "demand" 25 or 50 DKK per muffin. Luckily enough I found, that any amount of money would be accepted by www.araceagainstbreastcancer.dk, so therefore they will received the collected money.

This time I did not state a starting donation, but I left to each participants to make their price evaluation. 17 of my work colleagues turned up donating a total of 273 DKK, which equals a price on 16.05 DKK for each muffin, which is almost 5 DKK more compared to the last fund raising, where a muffin selling price was 11.38 DKK. 

As an extra little something, two colleague had their name drawn out in a muffin donation "lottery". One person got a glass blackberry jam with lemon and balcamico and the other person got a small bottle of blackcurrant rum.

October 10, 2012

Blackberry muffin

Blackberry muffin ready for PINK fundraising
I have been baking these blackberry muffins for a PINK fundraising tomorrow at work, so where my colleagues have to pay money in order to get a muffin. I have involved my good work colleague, who at the same time is my blackberry "supplier" between September and November, so he is providing the fruit and I am baking the muffins.

So cross your fingers for a good outcome (= many Danish kroners in the pot) of this muffin fundraising.

I have twisted my favourite muffin recipes on apple muffin with cinnamon for these blackberry muffins.

Blackberry muffin: - 24 muffins
Blackberries before mixing into muffin dough
  • 450 g cake flour
  • 1½ tabelspoon baking powder
  • 175 g sugar
  • 375 g buttermilk 
  • 2 eggs
  • 75 g oil 
  • 1/4 teaspoon salt
  • 500 g blackberries
  1. Heat the oven to 200'C (conventional oven)
  2. Mix cake flour, baking powder sugar together in a mixing bowl with a cooking spoon
  3. Add buttermilk, oil and egg into a shaker, and shake it together
  4. Add the liquid to the mixing bowl, and stir well
  5. Add blackberries into the muffin dough
  6. Fill into 24 muffin forms
  7. Bake at 200'C for 25 minutes in the middle of the oven

October 09, 2012

Out eating again with rowers

"Shoothing star"
Some time ago I was out eating again with my rowing friends in connection with a rowing tour. We had decided to eat out instead of bringing the usual casserole served together with rice, which is typical rowing food.

There is not that many places to eat in Julesminde, in case you do not want to eat in small fish & chips shops, so we ended up at Spisestedet. This evening the menu was limited due to a big  buffet being served. We did not feel like eating buffet food (it did look fine and interesting), we all ended up eating the only seafood being available, which is typical Danish dish called "Shooting star".

"Shooting star" is a fried fish fillet and boiled fish fillet served on white toast bread. The fish fillets are decorated with scrimps, white asparagus and mayonnaise.

This version of "Shooting star" was OK, but not expectional. I could have "lived without" the slice of salmon (the only seafood, which I have a hate relationship to) and the asparagus coming directly from a can !!!

The restaurant was more than happy to exchange the traditional white toast bread with rye bread. Otherwise the service was suffering from few servants, all being very young and lighter forgetful. It was a completely different experience compared to eating at Rudolf Matis, however it price level is also in total different league.

Would I eat at Spisestedet another time ? I do not really know how to answer this question. The food was OK, but I would perhaps prefer cafe instead of, which would have similar or slight lower price level.

October 08, 2012

Æble-daddel brød from "Hjemmebagt"

Apple-date bread - uuhmm :-)
 "Hjemmebagt" - 73 recipes - 18 accomplished = 55 recipes to bake

Adding apple and date pieces into the dough

Bread after finished raising in raise cart
With Autumn ruling outside with rain and wind, it was a perfect opportunity to start baking bread again and thereby continue on my "task" to bake a single recipe in the baking book "Hjemmebagt". It is actually 5½ month, since I last have been baking anything from this baking book in form of ringridderboller, so it is about time, that I got baking again.

I took the decision to bake the bread called "Æble-daddel brød" (= Apple-date bread), which in mu opinion is very fitting to all the apples here in Autumn.

The bread is a mix of three different flours (fine spelt, whole grain spelt and durum flour), salt, buttermilk, water and then apples and date of cause.

After kneading the bread, the diced apple and date in added into the bread by gentle kneading, be careful doing this, otherwise you end up with apple and date pieces everywhere in the kitchen. And you should also be careful with using plenty of flour in the bread raise cart/basket for the the last raising, before the bread is baked. If you use too little flour, it is going to be difficult to get the bread dough out of the raise cart, as the dough is sticking to it.

The bread has a lovely flavour with some level of sweetness coming from the pieces of apple and date.

Bread dough to be baked

Baked bread

October 07, 2012

Dinner af "Grappa"

Soup of Jerusalem artichoke
Recently I had the opportunity to eat at Restaurant Grappa located in Århus with a group of colleagues. Afterwards I was left with mixed impression, as some of the food was OK, while the rest was bland. Perhaps it related to the fact, that we were such a big group of people, that the menu had been ordered in advance for all of us, so we all served the same food.
Starter with salmon

We started with a thick creamy soup of Jerusalem artichoke. The texture was great, but the taste was too salty for me. I really dis-like salty food.

The second starter was salmon. It would nice, but after being served too much salmon during the years, I prefer anything other seafood than salmon. The three balls of salmon all had the same flavour profile, here it would have been great, if they have had three different flavours.

Beef with red & yellow beetroot
One of my work colleagues can not tolerate salmon, here the staff react smooth and fast and supplied another starter in form buchetta. She shared some of it with me and another colleague. And this really taste excellent !!!!

As main course we got beef served with potato mash, red & yellow beetroot. The colours was good, but again I experienced too so salt on the beef !!!

As a sweet ending we of cause were served tiramisu, which was pretty good being light and creamy with good taste combination.

Tiramisu
So as you can see, I am left with mixed impression based on this pre-ordered served menu. However, the fast reaction towards seafood allergy was very positive, and the seafood-free starter tasted great.


October 06, 2012

Lønnestræde´s blackberry jam with lemon and balcamico


Blackberry jam ready for use
When I saw, that Kate from What Kate Baked (being the hostess of the virtual tea table) had selected the theme to be Jam, Chutneys, Curds and Conserves, I knew at once, what type of jam, which I would make for this occasion. The jam should be based on the fruit in season, and that is of cause blackberries ! 

The Tea Time Table is a monthly blogging event managed  Karen from Lavender and Lovage and Kate from What Kate Baked. It was a surprise for me to read, that Kate originally found jam making "for too hard and for too likely to fail" ! For me jam making is an easy thing, when you either can work with jam sugar or use citrus fruits as main ingredients. And it practically takes no time, within ½ hour (1 hour making citrus jam) from cleaning the fruit you will have glasses of jam ready to be eaten or given away.


For this jam I decided to use the fruit in season, which is blackberries, and which my good work colleague is having surplus from his garden.

Making a jam "just from fruit and sugar" is my mind a little boring, I want to have that little extra touch of something else in my jams. So I "picked" the minds of various work colleagues, and have up with the combination of using lemon zest, lemon juice and balcamico as the little extra touch this time.

Blackberries ready for jam cooking
The lemon zest and lemon juice is giving a wonderful juicy character to the blackberries, and the balcamico is adding complexity to the taste. You could decided only to use lemon zest and lemon juice for your version of blackberry jam.

While I was making blackberry jam, Hannibal the Cat came into the kitchen after a wet rainy day out-door, and he took part in the jam making process sleeping away with an open eye from time to time from "his" chair to monitor the jam process.

As I did not want to mash the blackberries, I was left some blackberry juice without any berries in-side, this juice I filled into a bottle, which would suit pan cakes perfectly.

Lønnestæde´s blackberry jam with lemon and balcamico:
  • 1000 g blackberries
  • 500 g jam sugar with pectin
  • lemon (organic) - juice and zest
  • 50 g water
  • Blackberries with lemon zest in the cooking pot
  • ½ teaspoon balcamico
  1. Clean the blackberries.
  2. Peel the lemon and squeeze it for juice.
  3. Heat up the blackberries in a cooking pot together lemon peel, lemon juice and water.
  4. When the blackberries boiling, add the jam sugar and agitate.
  5. Bring the fruit to the boiling point and let it boil for 2 minutes.
  6. Prepare the jam glasses by filling them with boiling water. Do this step, while you start to heat the blackberries. 
  7. Fill the glass with jam and close the glass.

Hannibal the Cat sleeping away, while he dreams of mouse sushi

October 05, 2012

"Humus" of edam beans and peas

Green "humus"
I found this recipe on green "humus" in a magazine called OM... - a COOP magazine. It is very, very good alternative to the usual humus made on chickpeas with it´s wonderful green colour and fantastic flavour, so you should really try it yourself.

Wonderful colour combination
"Humus" of edam beans and peas:
  • 400 g edam beans with peel
  • 200 g peas
  • 3 tablespoons of lemon thyme - chopped
  • 1 dl mayonnaise
  • 2 tablespoon lemon juice
  • salt & pepper
  1. Defrost the edam beans and peas, if frozen.
  2. Remove the pod from the edam beans.
  3. Fill a cooking pot with water and salt, bring it to the boil.
  4. Add the edam beans and cook them for 1 minute.
  5. Add the peas and cook beans and peas for another 1 minute.
  6. Add the beans and peas in a sieve in order to remove the water. Afterwards cool down the beans and peas with cold water.
  7. Shake the beans and peas very well to remove the water.
  8. Add beans and peas into a food processor and run to the desired consistency.
  9. Add chopped lemon thyme, mayonnaise, lemon juice to the bean-pea mass in the food-processor and run it again to a homogeneous mass.
  10. Season with salt & pepper.
  11. Serve the "humus" of edam beans and peas with grissini, carrots and other fresh vegetable.

October 02, 2012

Dinner at la viet

Selection of starters

In connection with an international meeting at work with colleagues from around the world we wanted to eat at an informal place, where eating and talking would have equal amount of space. It is also important, that the many different nationalities would feel comfortable with the food served.

Having all these things in mind, we decided to try out la viet for this occasion. And here we had a good start, as we could choose between chop sticks and fork & knife at each individual seat, so each person took use their preference as cutlery.

As usual, when we are such a big group of people (20 persons), the menu had been decided upon the booking of the tables. However, la viet responded without hesitation, when it turned, that one of the participants was vegetarian and therefore is not eating meat, eggs and seafood.

Main dish - chicken with green curry

As a start we had a selections of delicious tasting starter consisting of:
  • crips scrimps with chili, basil and coriander
  • rice paper with vegetable and duck
  • chicken wings with anise and chili
Afterwards we had another selection of three main course in form of:
Noddle dish with port and vegetable
  • chicken with green curry and ginger
  • wok with scrimps
  • noddle with pork and vegetable
The level of spice was just perfect, tasteful, spicy and not to hot.

I would like to come back another time to try some more dishes at la viet.


LinkWithin

Related Posts Plugin for WordPress, Blogger...